Foam Rolling Guide: Benefits, Techniques, and Mistakes to Avoid
The Ultimate Guide to Foam Rolling: Relieve Tension, Boost Recovery, and Unlock Flexibility
If you have stepped into a commercial gym, crossfit box, or physical therapy clinic over the last decade, you have undoubtedly seen them: long, cylindrical tubes of dense foam scattered across the mats. To the uninitiated, these tools look like nothing more than oversized pool noodles. To athletes, weekend warriors, and desk workers alike, they are a saving grace for tight, aching muscles.
This practice is known as foam rolling—or, more formally, Self-Myofascial Release (SMR).
While it sometimes feels like a form of deliberate, self-inflicted torture, foam rolling has revolutionized the way we approach fitness recovery and mobility. But why exactly does rolling your weight over a piece of hard foam feel so incredibly effective? How does it actually change your physiology, and how can you do it properly without accidentally injuring yourself?
This comprehensive guide will break down the science of foam rolling, detail step-by-step techniques for your entire body, highlight the most common mistakes to avoid, and help you select the perfect roller for your needs.
The Science of Foam Rolling: What is Fascia?
To understand why foam rolling works, you first need to understand a hidden network within your body called fascia.
Fascia is a specialized web of connective tissue that wraps around every single muscle, bone, nerve, and organ in your body. Think of it like a form-fitting, highly flexible internal bodysuit. In its healthy state, fascia is wavy, hydrated, and relaxed, allowing your muscles to slide and glide past one another effortlessly as you move.
However, life gets in the way. Repetitive strain from intense workouts, poor posture from sitting at a desk all day, dehydration, and injuries cause the fascia to lose its elasticity. It becomes sticky, dense, and develops micro-adhesions—commonly referred to as “knots” or “trigger points.” These adhesions restrict your range of motion, alter your biomechanics, and cause localized or referred pain.
Healthy Fascia (Hydrated & Pliable) ---> Stress/Strain ---> Knots/Adhesions (Restricted Movement)
                                                                 |
                                                    [ Foam Rolling / SMR Applied ]
                                                                 |
                                                                 v
                                            Restored Blood Flow & Tissue Elasticity
When you apply targeted pressure to these trigger points using a foam roller, you trigger a physiological response:
- Autogenic Inhibition: The sustained pressure stimulates specialized sensory receptors called Golgi Tendon Organs (GTOs). The GTOs signal the central nervous system that the muscle is under tension, prompting the brain to tell the muscle to relax.
- Fluid Exchange: The mechanical pressure acts like squeezing a sponge. It pushes stagnant fluid out of the tissue, allowing fresh, nutrient-rich blood and water to rush back in once the pressure is released, rehydrating the fascia.
The Top Benefits of Foam Rolling
Incorporating a foam roller into your daily or post-workout routine yields a massive return on investment. Here is what consistent rolling can do for your body:
1. Accelerates Post-Workout Recovery
One of the primary reasons athletes love foam rolling is its ability to combat Delayed Onset Muscle Soreness (DOMS). By flushing out metabolic waste products (like lactic acid) and bringing fresh oxygenated blood to recovering tissues, foam rolling significantly cuts down the time you spend feeling stiff and sore after a heavy leg day.
2. Increases Temporary Range of Motion and Flexibility
Unlike static stretching, which simply elongates muscle fibers, foam rolling breaks up the fascial restrictions keeping those fibers bound together. Studies show that rolling before a workout increases your joint range of motion just as effectively as stretching, but with one major advantage: it doesn’t decrease muscle power or performance, whereas prolonged static stretching can.
3. Alleviates Chronic Pain and Tightness
For those who sit at a desk for eight hours a day, certain muscle groups—like the hip flexors, glutes, and upper back—become chronically shortened and tight. Foam rolling acts as a deep tissue massage, melting away the stress-induced tension that builds up from sedentary lifestyles.
4. Enhances Mind-Muscle Connection
Slow, deliberate rolling requires you to pay close attention to how your body feels. It forces you to identify where you are holding tension, increasing your overall body awareness and proprioception, which translates to better form during compound exercises like squats and deadlifts.
Step-by-Step Foam Rolling Blueprint
To get the most out of your sessions, you need to target the areas that act as movement bottlenecks. Always remember the fundamental rule of foam rolling: Roll slowly, breathe deeply, and never roll directly over bones or joints.
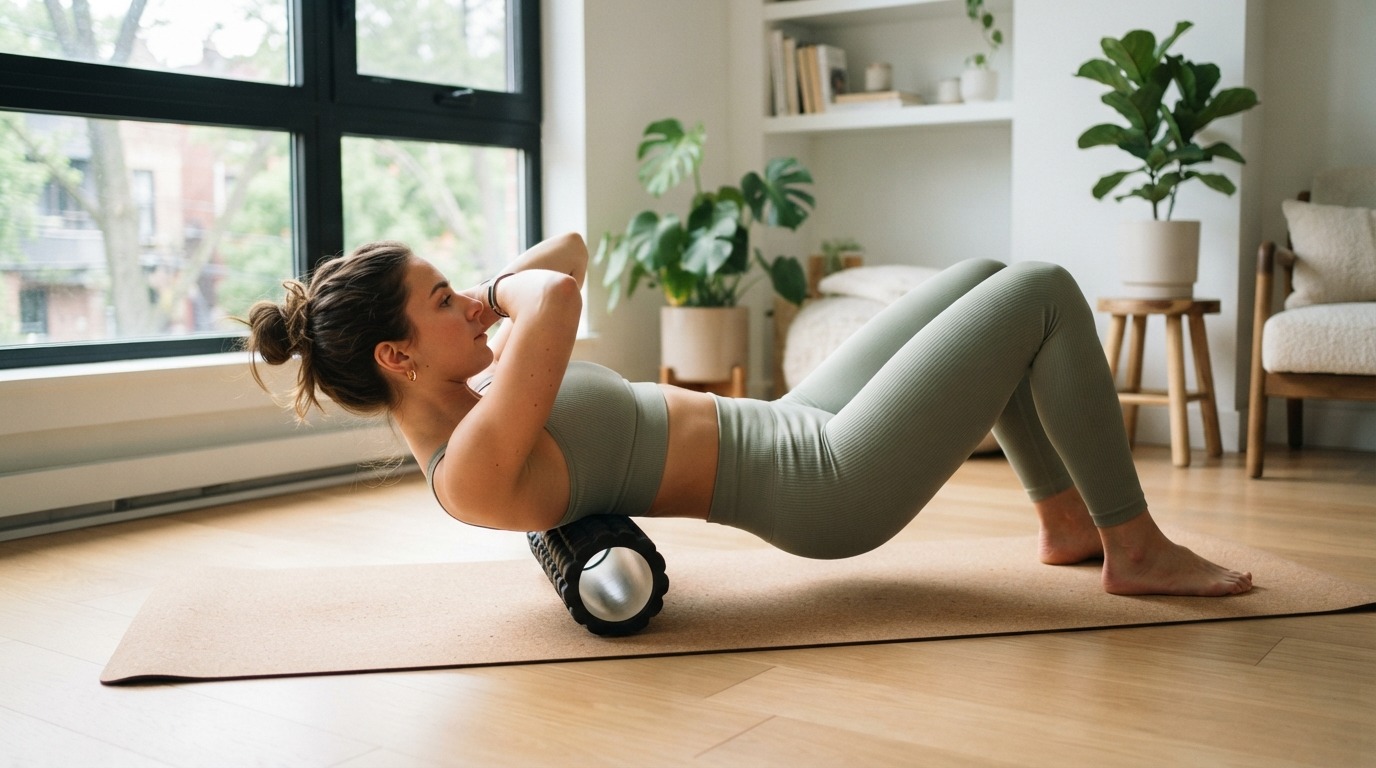
1. The Upper Back (Thoracic Spine)
Improves posture and relieves shoulder stiffness caused by slouching over computers.
- How to do it: Place the roller horizontally underneath your shoulder blades. Cross your arms over your chest or gently support your head with your hands (do not pull on your neck). Lift your hips slightly off the floor.
- The Movement: Use your legs to slowly roll from the middle of your back up to the base of your neck. Avoid rolling past your ribcage into the lower back. When you find a tender spot, lower your hips, lean backward over the roller, and take three deep breaths.
2. The Calves (Gastrocnemius and Soleus)
Relieves ankle stiffness, improves squat depth, and prevents shin splints.
- How to do it: Sit on the floor with your legs extended and place the roller under your lower legs, just above the Achilles tendon. Place your hands on the floor behind you to support your weight.
- The Movement: Lift your hips and slowly roll up toward the back of your knees. Turn your toes inward and outward to target both the medial and lateral sides of the calf muscle. For extra pressure, cross one leg over the other.
3. The Quads (Quadriceps)
Alleviates knee strain and hip tightness.
- How to do it: Lie face down in a forearm plank position with the foam roller placed horizontally underneath the top of your thighs. Keep your core engaged so your lower back doesn’t sag.
- The Movement: Use your forearms to crawl forward and backward, rolling from the top of your hip down to just above the kneecap. Because the quads are a large muscle group, roll in small zones (upper, middle, lower half) to ensure deep tissue penetration.
4. The Glutes (Gluteus Maximus and Piriformis)
Relieves lower back pressure and opens up tight hips.
- How to do it: Sit directly on top of the foam roller. Shift your weight slightly to the right side and cross your right ankle over your left knee (forming a figure-4 shape). Place your right hand on the floor behind you for stability.
- The Movement: Pivot slightly and roll back and forth over the meaty part of your right glute. Lean into different angles to seek out deep knots. Switch sides and repeat.
5 Critical Mistakes to Avoid
Foam rolling looks simple, but executing it incorrectly can actually increase inflammation or result in injury. Avoid these common pitfalls:
Mistake #1: Rolling Directly on the Lower Back
The lumbar spine (lower back) does not have the protection of the rib cage like the thoracic spine does. Rolling directly over your lower back causes the surrounding core muscles to violently contract to protect the spine, creating more tension. Furthermore, the pressure can unsafely hyperextend the lumbar joints. If your lower back hurts, roll your glutes, hips, and upper back instead—these are usually the real culprits.
Mistake #2: Rolling Too Fast
Treating your foam roller like a rolling pin on pastry dough does almost nothing for your fascia. Rapid rolling triggers a protective mechanism in the nervous system, causing muscles to tighten up rather than release. You should move at a glacial pace—about one inch per second.
Mistake #3: Staying Directly on a Knot Too Long
When you hit an incredibly painful trigger point, your instinct might be to park the roller directly on top of it and press down with all your might for five minutes. This can compress nerves and bruise the tissue.
- The Correct Approach: Stay on a localized tender spot for no more than 30 to 45 seconds. Keep breathing, let the muscle soften, and then move on. You can always return to it later in the session.
Mistake #4: Rolling the IT Band Directly
The Iliotibial (IT) Band is a thick, fibrous band of connective tissue running down the outside of your thigh. It is not a muscle, meaning it cannot “stretch” or “relax” through mechanical compression. If your IT band feels tight, rolling it directly usually just compresses the bursa and nerves underneath, causing extreme pain and inflammation. Instead, roll the muscles that attach to the IT band: the glutes and the TFL (tensor fasciae latae) at the top hip bone.
Mistake #5: Holding Your Breath
Because SMR can be painful, many people instinctively hold their breath or breathe shallowly. This signals the body that it is in danger, sending it into a “fight or flight” response which locks up the muscles. Focus on long, diaphragmatic exhalations to stimulate the parasympathetic nervous system, which promotes deep physical relaxationamazon.com/s/?ie=UTF8&keywords=best+fitness+tracker+watch&index=aps&tag=hydglogoo-20&ref=pd_sl_6ubmcv5fwt_e&adgrpid=157447106804&hvpone=&hvptwo=&hvadid=681338732286&hvpos=&hvnetw=g&hvrand=15648899178163410846&hvqmt=e&hvdev=c&hvdvcmdl=&hvlocint=&hvlocphy=9223217&hvtargid=kwd-332626068884&hydadcr=28238_14732467&mcid=1dd7588c9fc13bc1969fe56ad53f3ed9.
Choosing the Right Foam Roller
Not all foam rollers are created equal. The right tool depends heavily on your experience level and pain tolerance:
| Roller Type | Best For | Characteristics |
| Low-Density (Soft) | Beginners, older adults, or highly sensitive/injured muscles. | Cushiony feel; provides gentle, superficial pressure without intense pain. |
| High-Density (Firm) | Experienced lifters, athletes, and those needing deep tissue work. | Rigid construction; does not lose shape over time. Penetrates deep layers. |
| Grid / Rumble Roller | Advanced users looking to target localized trigger points. | Features built-in ridges, knobs, or matrices to mimic a massage therapist’s fingers. |
| Travel Size / Massage Ball | Targeting small areas like the feet, chest, or deep glutes on the go. | Highly portable; easily isolates tricky anatomical corners. |
The Verdict
Foam rolling is one of the cheapest, most accessible, and highly effective tools available for physical longevity. By spending just 5 to 10 minutes a day rolling out your primary muscle groups, you can undo hours of sedentary desk work, dramatically lower your risk of exercise-related injuries, and feel lighter and more agile in your daily life.
Grab a roller, slow down, breathe through the discomfort, and give your body the restorative maintenance it deserves.The Ultimate Guide to Foam Rolling: Relieve Tension, Boost Recovery, and Unlock Flexibility
If you have stepped into a commercial gym, crossfit box, or physical therapy clinic over the last decade, you have undoubtedly seen them: long, cylindrical tubes of dense foam scattered across the mats. To the uninitiated, these tools look like nothing more than oversized pool noodles. To athletes, weekend warriors, and desk workers alike, they are a saving grace for tight, aching mu.